
How to Start Wing Foiling: Mastering the Learning Curve and Gear Selection
Spending 90% of your first session face-planting into the North Sea isn't a rite of passage; it's a sign your gear isn't pulling its weight. To truly master Wing Foiling: Focus on the learning curve, overcoming common frustrations (getting on foil), gear selection (board volume, wing size), and safety gear from your very first outing to ensure you're actually riding, not just swimming. We've all felt that specific frustration of the "taxi" phase, where the board refuses to lift and every small swell feels like a mountain. It's easy to get lost in the technical jargon, but getting it right is the difference between a wasted afternoon and an epic session.
We promise to help you bypass the most common beginner headaches with our expert breakdown of the gear and techniques that actually work. We're covering the essential "Weight + 30" volume rule, how to select the perfect wing size for gusty UK coastal waters, and the safety essentials that build your confidence for solo sessions. From your first flight to sustained glides, we've got the shop-floor knowledge to get you on foil faster.
Key Takeaways
- Demystify the first 10 hours on the water by breaking the journey into three clear phases, from basic wing handling to your first epic flight.
- Gain a competitive edge by mastering Wing Foiling: Focus on the learning curve, overcoming common frustrations (getting on foil), gear selection (board volume, wing size), and safety gear. to ensure your kit is perfectly dialled for your weight.
- Identify the crucial 'sweet spot' on the board’s centre line and learn the pumping technique to transition from taxiing to full flight with confidence.
- Optimise your setup for UK conditions with essential safety hardware, including leashes and impact vests designed to keep you safe without hindering your movement.
- Leverage our rider-owned expertise to select the ultimate 2026 gear from Naish and Duotone, ensuring every session is an investment in your progression.
Understanding the Wing Foiling Learning Curve: What to Expect
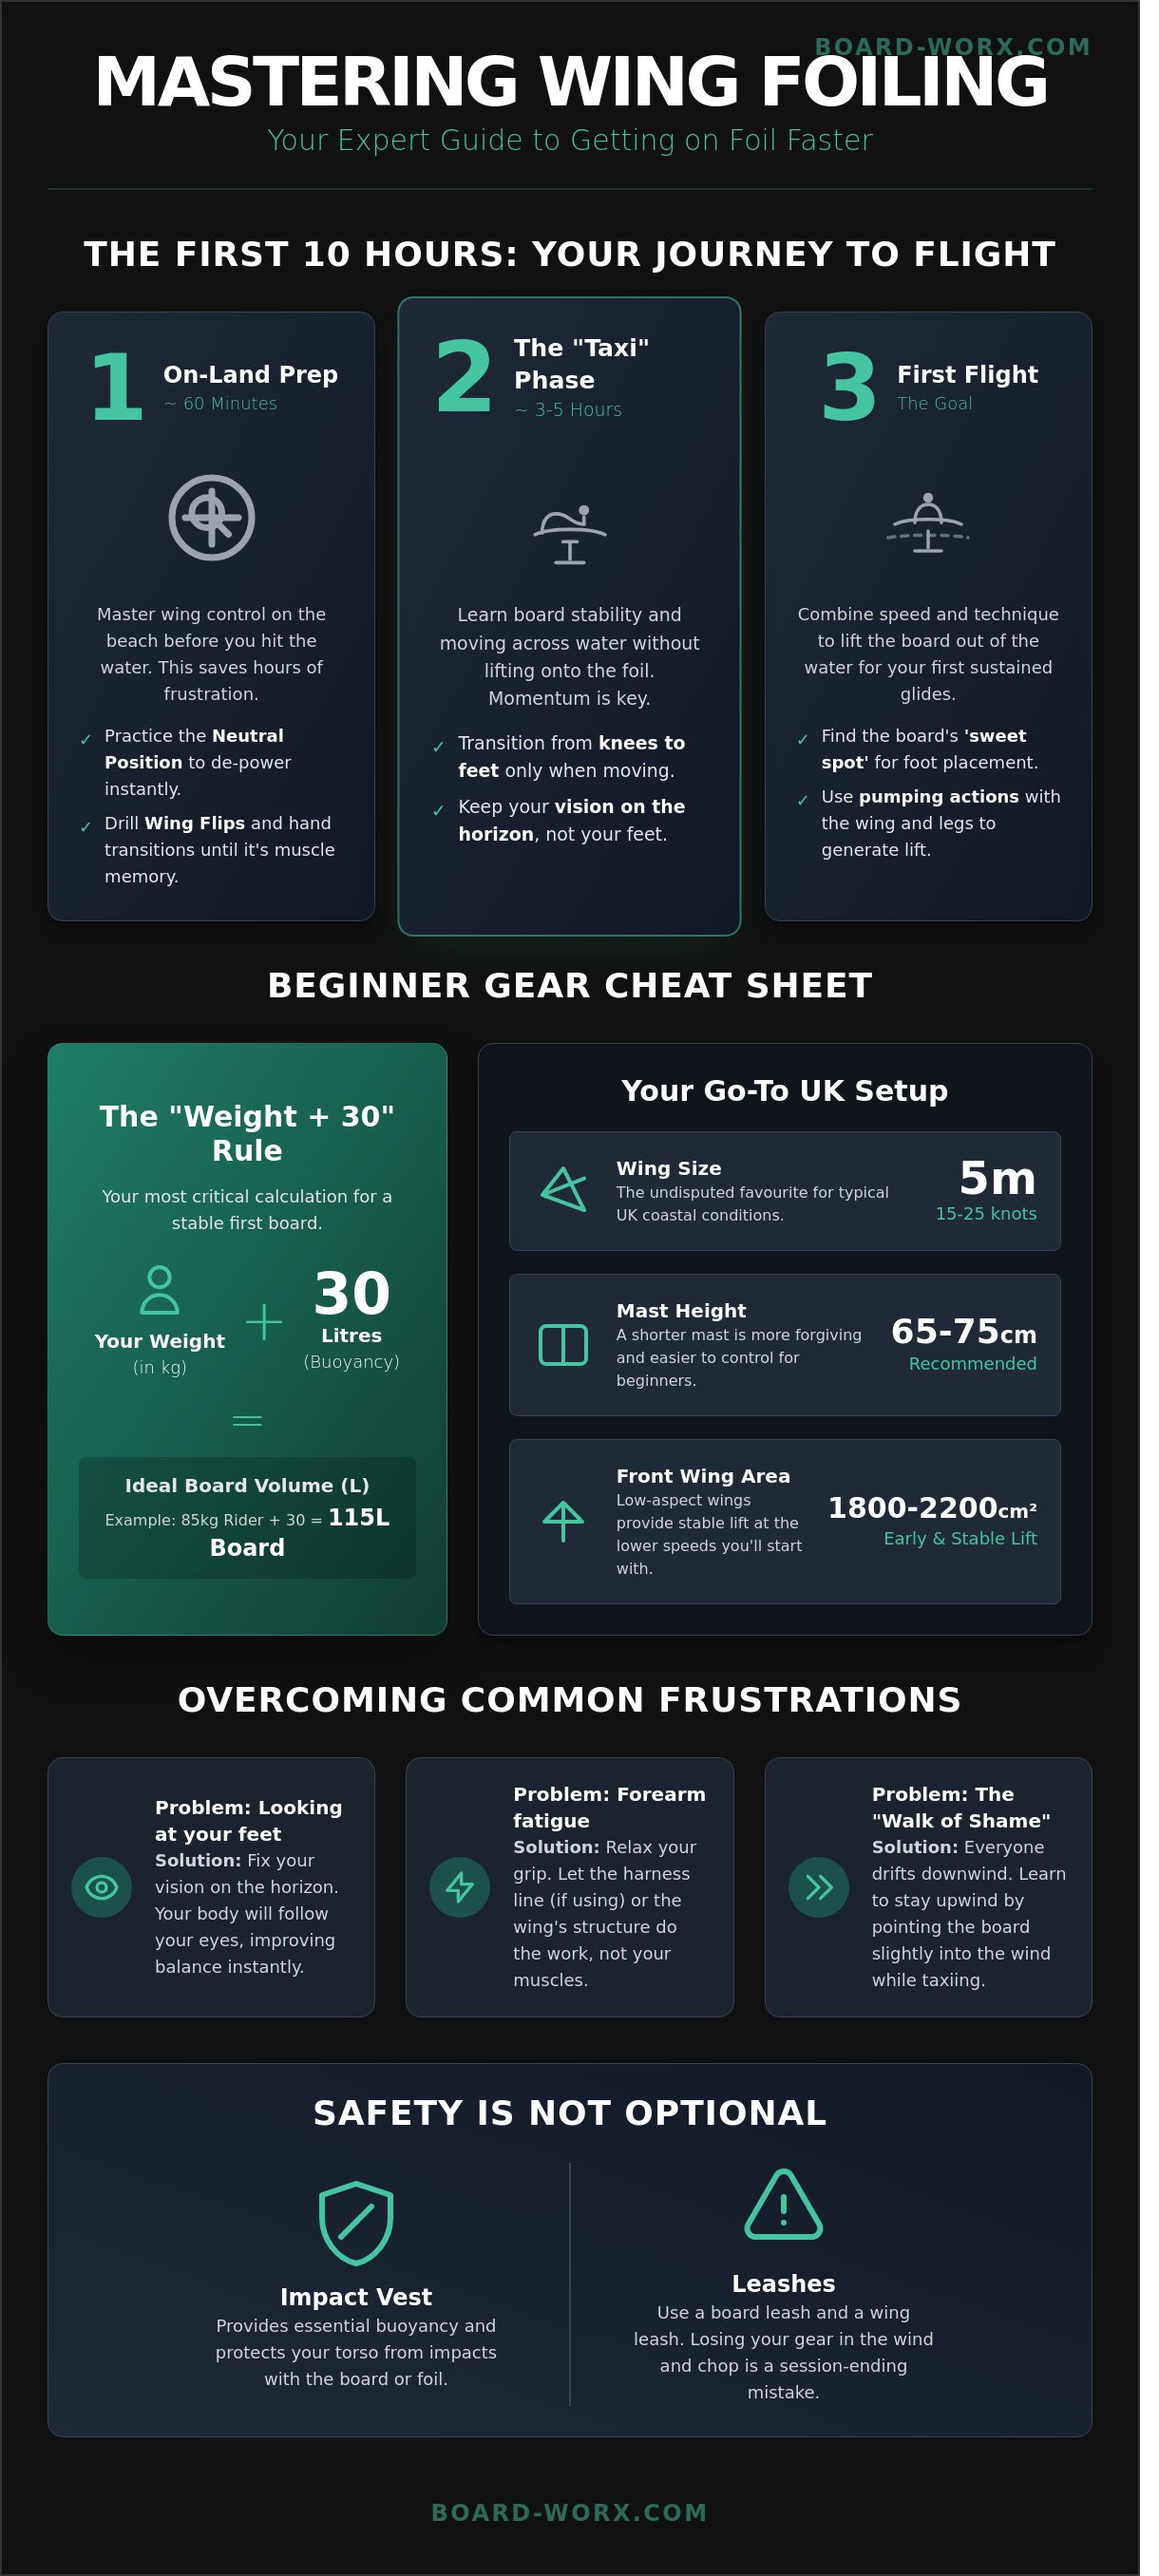
Wing foiling is the ultimate hybrid of windsurfing, kitesurfing, and foiling technology. It's the fastest-growing watersport in the UK because it strips away the complexity of lines and rigs, leaving you with a direct connection to the wind and water. However, don't expect to be gliding silently over the Solent on your first afternoon. To master Wing Foiling: Focus on the learning curve, overcoming common frustrations (getting on foil), gear selection (board volume, wing size), and safety gear before you even think about heading into the surf. Most beginners find the first 10 hours are a physical graft, split between technical drills and building the specific muscle groups needed to handle the kit.
Your previous watersports experience acts as a double-edged sword. Windsurfers often find wing handling intuitive within the first 120 minutes, yet they frequently struggle with the fore-and-aft balance required by the foil. Kitesurfers understand the wind window perfectly but often try to lean back too far, which leads to immediate stalls. Prepare for the "walk of shame." This is the rite of passage where you drift 300 metres downwind and have to trek back up the beach with your gear. It's part of the process. Expect significant forearm fatigue in your first three sessions as you learn to relax your grip and let the wing do the work.
Phase 1: Wing Control and On-Land Preparation
Success on the water starts with 60 minutes of focused beach drills. You must master the neutral position, holding the wing by the leading-edge handle so it flags out and de-powers instantly. Unlike kitesurfing, where the power is often above you, winging requires a 90-degree relationship between your arms and the breeze. Practise the flip and hand-over-hand transitions until they're muscle memory. If you're fumbling for handles while balancing on a board, you've already lost the battle. Technical competence on land saves hours of frustration in the chop.
Phase 2: The Taxi Phase and Board Stability
The taxi phase is where you learn to move across the water without the foil engaging. You'll likely start on a board with 30 to 40 litres of volume above your body weight to ensure stability. Focus on these key elements:
- Kneeling to Standing: Transition from your knees to a crouched stance only when you have forward momentum.
- Vision: Look at the horizon, not your feet. Fixating on the board's nose is the quickest way to lose your balance in UK coastal conditions.
- Momentum: Use the wing to pull yourself upright. Without speed, a foil board is just a wobbly raft.
By focusing on these foundational steps, you'll overcome the initial hurdles of Wing Foiling: Focus on the learning curve, overcoming common frustrations (getting on foil), gear selection (board volume, wing size), and safety gear. This stage is about building the "foil brain" required to manage height and speed simultaneously. Stay patient; the feeling of that first flight makes every minute of the taxi phase worth it.
Technical Gear Selection: Getting Your Ratios Right
Nailing your equipment setup is the difference between a frustrating swim and your first flight. Mastering Wing Foiling: Focus on the learning curve, overcoming common frustrations (getting on foil), gear selection (board volume, wing size), and safety gear requires a methodical approach to your hardware. The most critical calculation for any newcomer is the 'Weight + 30' rule. If you weigh 85kg, your first board should have at least 115 litres of volume. This extra buoyancy provides a stable platform to stand on before the foil generates lift, which prevents you from sinking during those wobbly first taxying sessions.
For UK riders, a 5m wing is the undisputed favourite. It handles the 15 to 25 knot range typical of our coastlines perfectly. It provides enough grunt to get you moving without becoming a handful when the wind picks up. Pair this with a mast between 65cm and 75cm. While an 85cm mast looks high-performance, it increases the leverage against you, making every tiny foot movement feel magnified. A shorter mast keeps your centre of gravity lower and makes those initial crashes much more forgiving.
The front wing surface area is your engine for lift. Beginners should look for a low-aspect wing between 1800cm² and 2200cm². These foils are thicker and wider, providing stable lift at much lower speeds. This means you won't need to pump like a pro to get the board out of the water. It’s all about getting you on foil as early as possible with minimal effort.
Choosing Your First Wing Board
Width is more important than length for early stability. A board that is 28 to 31 inches wide offers the lateral balance needed to get your feet in position. Inflatable boards are brilliant for beginners because they're kinder to your knees and won't ding when you inevitably drop the foil on them. Ensure your choice has a solid centre handle and a kick tail. That angled tail helps the board release from the water's surface, making it roughly 20% easier to pop up and start flying.
Selecting the Right Foil and Wing Combination
Low-aspect foils are essential for stability. High-aspect foils are built for speed but they'll drop you like a stone if your speed dips. Rigid handles on your wing are the current gold standard, offering direct power transfer and making it easier to flip the wing over in the water. If you're unsure which setup fits your local spot, check our latest wing foil packages to see what the locals are riding. Matching your wing size to the average 18-knot UK breeze ensures you're always powered up and ready to shred.
How to Get on Foil: Overcoming Common Frustrations
You've spent your first few sessions taxiing across the water, but the real magic happens when the hull leaves the surface. Mastering Wing Foiling: Focus on the learning curve, overcoming common frustrations (getting on foil), gear selection (board volume, wing size), and safety gear requires a shift from passive riding to active weight management. The sensation of flight is incredible, but getting there involves a specific sequence of movements that can feel counter-intuitive at first. Most riders find they need at least 10 to 12 knots of consistent wind to generate the initial lift required for their first flight.
- The Sweet Spot: Keep your feet locked onto the board's centre line. If your back foot is even 2cm off-centre, the foil will roll as it rises, leading to an immediate wipeout.
- The Pumping Rhythm: Don't just pull the wing. Coordinate a sharp, downward pull of the wing with a rhythmic "bounce" on your back leg to engage the foil's lift.
- Managing the Breach: If you hear a loud "slurp" and the board drops, you've breached. This happens when the foil reaches the surface and sucks in air. Lean forward instantly to recover.
The Mechanics of the Take-off
Generating board speed is your absolute priority. Without a minimum velocity of roughly 8mph, the foil won't have enough hydrodynamic lift to support your weight. Once you're taxiing at speed, use the 'kick-start' motion. This involves shifting your weight slightly back to tilt the foil upwards while simultaneously pumping the wing to create a burst of power. Balance is a game of millimetres here. If you lean too far back, you'll "loop out" and the board will shoot forward. Keep your hips over the centre of the board to maintain a stable pitch.
Troubleshooting Your First Flight
If you're stalling, check your wing angle. Beginners often pull the wing too far across their body, which kills power. Keep the wing high and at a 45-degree angle to the wind to maintain drive. When you finally experience "over-foiling," where the board rises too quickly, don't panic. Apply immediate front-foot pressure. Think of your front foot as the "down" button on an elevator. Pressing through your front toes levels the board and keeps the foil submerged, ensuring a smooth, controlled glide rather than a terrifying catapult. Consistent practice on these subtle shifts is what separates a long session from a frustrating afternoon of splashing.
Safety Gear and UK Conditions: Protecting Your Session
Don't let an epic session turn into a Coastguard call-out because you skimped on the essentials. Your leash is the most vital piece of hardware in your kit bag. In a 20mph gust, an unattached board can drift 50 metres away in under 10 seconds, leaving you swimming in open water. Always use a heavy-duty coiled leash for your board and a dedicated wrist or waist leash for your wing. This ensures your gear stays with you during the inevitable spills that come with Wing Foiling: Focus on the learning curve, overcoming common frustrations (getting on foil), gear selection (board volume, wing size), and safety gear.
Choosing between an impact vest and a buoyancy aid depends on your confidence levels, but most foil riders prefer the streamlined fit of an impact vest. These vests provide critical rib protection when you're hitting the water at 15 knots, and they don't bulk up around your chest, making it easier to climb back onto the board. If the wind drops below 8 knots and you're stranded, you need a self-rescue plan. Practice the "pack-down" on land first. This involves securing your wing to the board and using the board as a raft to paddle back to shore. In British coastal environments, watch for "dark water" indicating incoming gusts and "glassy patches" that signal a lull where you might lose flight.
Thermal Management: Wetsuits and Accessories
UK waters rarely climb above 17°C, so a high-quality 5/4mm wetsuit is your year-round workhorse. Look for suits with liquid-taped seams to block the North Sea chill. Neoprene boots are non-negotiable; foiling involves a lot of kicking and climbing, and those carbon foil wings have trailing edges sharp enough to cut skin. A 5mm boot protects your feet and provides the grip needed for stable footwork. During the winter months, add a 3mm hood and 2mm gloves to prevent the dreaded "ice cream headache" and keep your hands functional for wing handling.
Communication and On-Water Safety
Never head out for a solo session without a way to call for help. A waterproof phone case tucked inside your wetsuit or a Personal Locator Beacon (PLB) attached to your vest can be a lifesaver if a leash snaps or the offshore wind picks up. When sharing the peak with kitesurfers, remember the right-of-way rules: the rider on a starboard tack (right hand forward) generally has priority. However, the "Buddy System" remains your best defence. Always tell someone on shore your expected return time, especially when mastering Wing Foiling: Focus on the learning curve, overcoming common frustrations (getting on foil), gear selection (board volume, wing size), and safety gear in challenging UK conditions.
Ready to kit up for your next session? Check out our range of high-performance safety gear and wetsuits to stay protected on the water.
Ready to Fly? How Boardworx Supports Your Journey
At Boardworx, we don't just shift boxes; we live for the water. Being a rider-owned shop means every piece of kit in our warehouse is there because we've tested it in the challenging conditions of the UK coastline. Generic retailers can't tell you how a 5m wing handles a gusty 22-knot afternoon at Whitstable or Hayling Island, but we can. Our 2026 lineup features the latest innovations from Naish and Duotone, including new lightweight canopy materials and refined strut geometries that make flying easier than ever.
We know that Wing Foiling: Focus on the learning curve, overcoming common frustrations (getting on foil), gear selection (board volume, wing size), and safety gear can feel overwhelming for beginners. That's why we offer custom wing foil packages. By bundling your board, wing, and foil together, you can save up to 15% compared to buying items individually. We ensure your setup is session-ready and can deliver it anywhere in the UK, typically within 48 hours, so you're ready to hit the water the moment the wind drops in.
Expert Advice and Gear Maintenance
Protecting your investment is vital for long-term performance. Salt corrosion is the enemy of your gear; always rinse your wing and foil with fresh water after every session. Pay close attention to the valves and leash attachments. We recommend a 5-minute pre-session safety check: tighten every foil bolt and inspect your board's tracks. Vibration during transport can loosen hardware, and losing a front wing mid-session is a costly mistake. As your skills grow, we'll help you manage the transition to advanced kit. When you're ready to drop 30 litres of board volume or switch to a high-aspect foil for better glide, our team provides the technical breakdown you need to make the right move.
Join the Boardworx Community
The journey doesn't end when you leave the shop. Follow our blog for the latest stoke, weather tips, and technical deep-dives into new wing designs. We're more than a shop; we're a specialist hub for enthusiasts. Visit us in-store to talk gear with riders who are out there every week, or give us a ring for a no-nonsense chat about your progression. We're dedicated to getting you on the foil and keeping you there.
Claim Your First Flight
Your progression depends on matching your ambition with the right technical setup. Our comprehensive approach to Wing Foiling: Focus on the learning curve, overcoming common frustrations (getting on foil), gear selection (board volume, wing size), and safety gear. ensures you have the knowledge to succeed. It's about more than just buying a board; it's about joining a community that's been obsessed with the water since 1982. As a rider-owned specialist, we only stock equipment we'd trust during a heavy session in local UK conditions. We've tested every wing and foil we sell to ensure they deliver the performance you need to move from your first taxiing runs to full flight.
We offer free UK delivery on all major hardware, so you can spend less time waiting and more time hitting the water. The learning curve might feel steep at first, but that moment the foil engages and the noise of the chop disappears is pure magic. Trust your gear, stay safe with a quality impact vest, and get ready to experience the ultimate freedom of flight. We'll see you at the beach.
Gear up for your first flight with our expert-selected Wing Foil Packages
Frequently Asked Questions
Is wing foiling harder to learn than kitesurfing?
Wing foiling is significantly easier and safer to pick up than kitesurfing. Most beginners at our UK coastal centres find they can master the basics within 2 to 3 sessions. You don't have 25-metre lines to manage, and the power delivery is instant and intuitive. It's a much lower-stakes way to get your wind-sport fix without the complex rigging or safety risks associated with a kite.
What size wing should a beginner buy for UK winds?
A 5-metre wing is the gold standard for starting out in typical 15 to 25-knot UK conditions. This size offers the grunt needed to get you on foil in gusty British weather while remaining light enough to handle easily. If you weigh over 85kg, consider stepping up to a 6-metre wing to ensure you aren't stuck slogging when the wind dips. It's the most versatile tool for spots like Hayling Island or Poole Harbour.
Do I need a special wetsuit for wing foiling?
You don't need a wing-specific suit, but a high-quality 5/4mm blind-stitched wetsuit is vital for 10-month UK seasons. Winging involves significant wind chill and plenty of time submerged during the early stages. Look for a suit with reinforced knees to handle the constant scrambling onto the board. We recommend a front-zip model for maximum flexibility when you're pumping the wing to get moving.
How much board volume do I need for my weight?
Beginners should choose a board with a volume equal to their weight in kilograms plus 30 to 40 litres. If you weigh 80kg, you should hunt for a 110 or 120-litre board. This extra buoyancy provides the stability needed to stand up before the board starts moving. Proper board selection is the fastest way to overcome the initial frustrations of wing foiling and start flying.
Is it safe to wing foil alone in the sea?
It's never recommended to wing foil alone in the sea. Coastal conditions in the UK can shift in under 15 minutes, and a broken leash or offshore gust can leave you stranded. Always head out with a mate or at a busy spot where 5 or more riders are already on the water. Carry a waterproof phone case or a PLB if you're exploring less crowded coastlines.
Can I learn to wing foil on a standard SUP board?
You can learn wing handling on a standard SUP, but you won't ever fly without a foil box. Using a 10-foot SUP is a brilliant way to spend your first 60 minutes mastering wing control without the instability of a foil. Once you've nailed the taxiing phase, you must transition to a dedicated foil board to experience the actual lift and speed of the sport.
What is the most common mistake beginners make when trying to fly?
The most common mistake is keeping your weight too far back on the board. This causes the foil to breach the surface and stall instantly. 90% of beginners struggle because they don't lean forward enough to level the flight. Keep your chest over the centre line and apply pressure through your front foot to keep the board stable as it leaves the water.
How long does it take to stay up on the foil consistently?
Most riders achieve consistent, sustained flights after 10 to 15 hours of active water time. Wing foiling requires specific muscle memory that only develops through repetition. By your fifth session, you'll likely be managing 50-metre runs in both directions. Expect to spend the first few sessions falling and climbing back on, but the payoff of that first silent glide is worth every splash.