
Mastering the Wing Foiling Learning Curve: A Guide to Gear and Progression
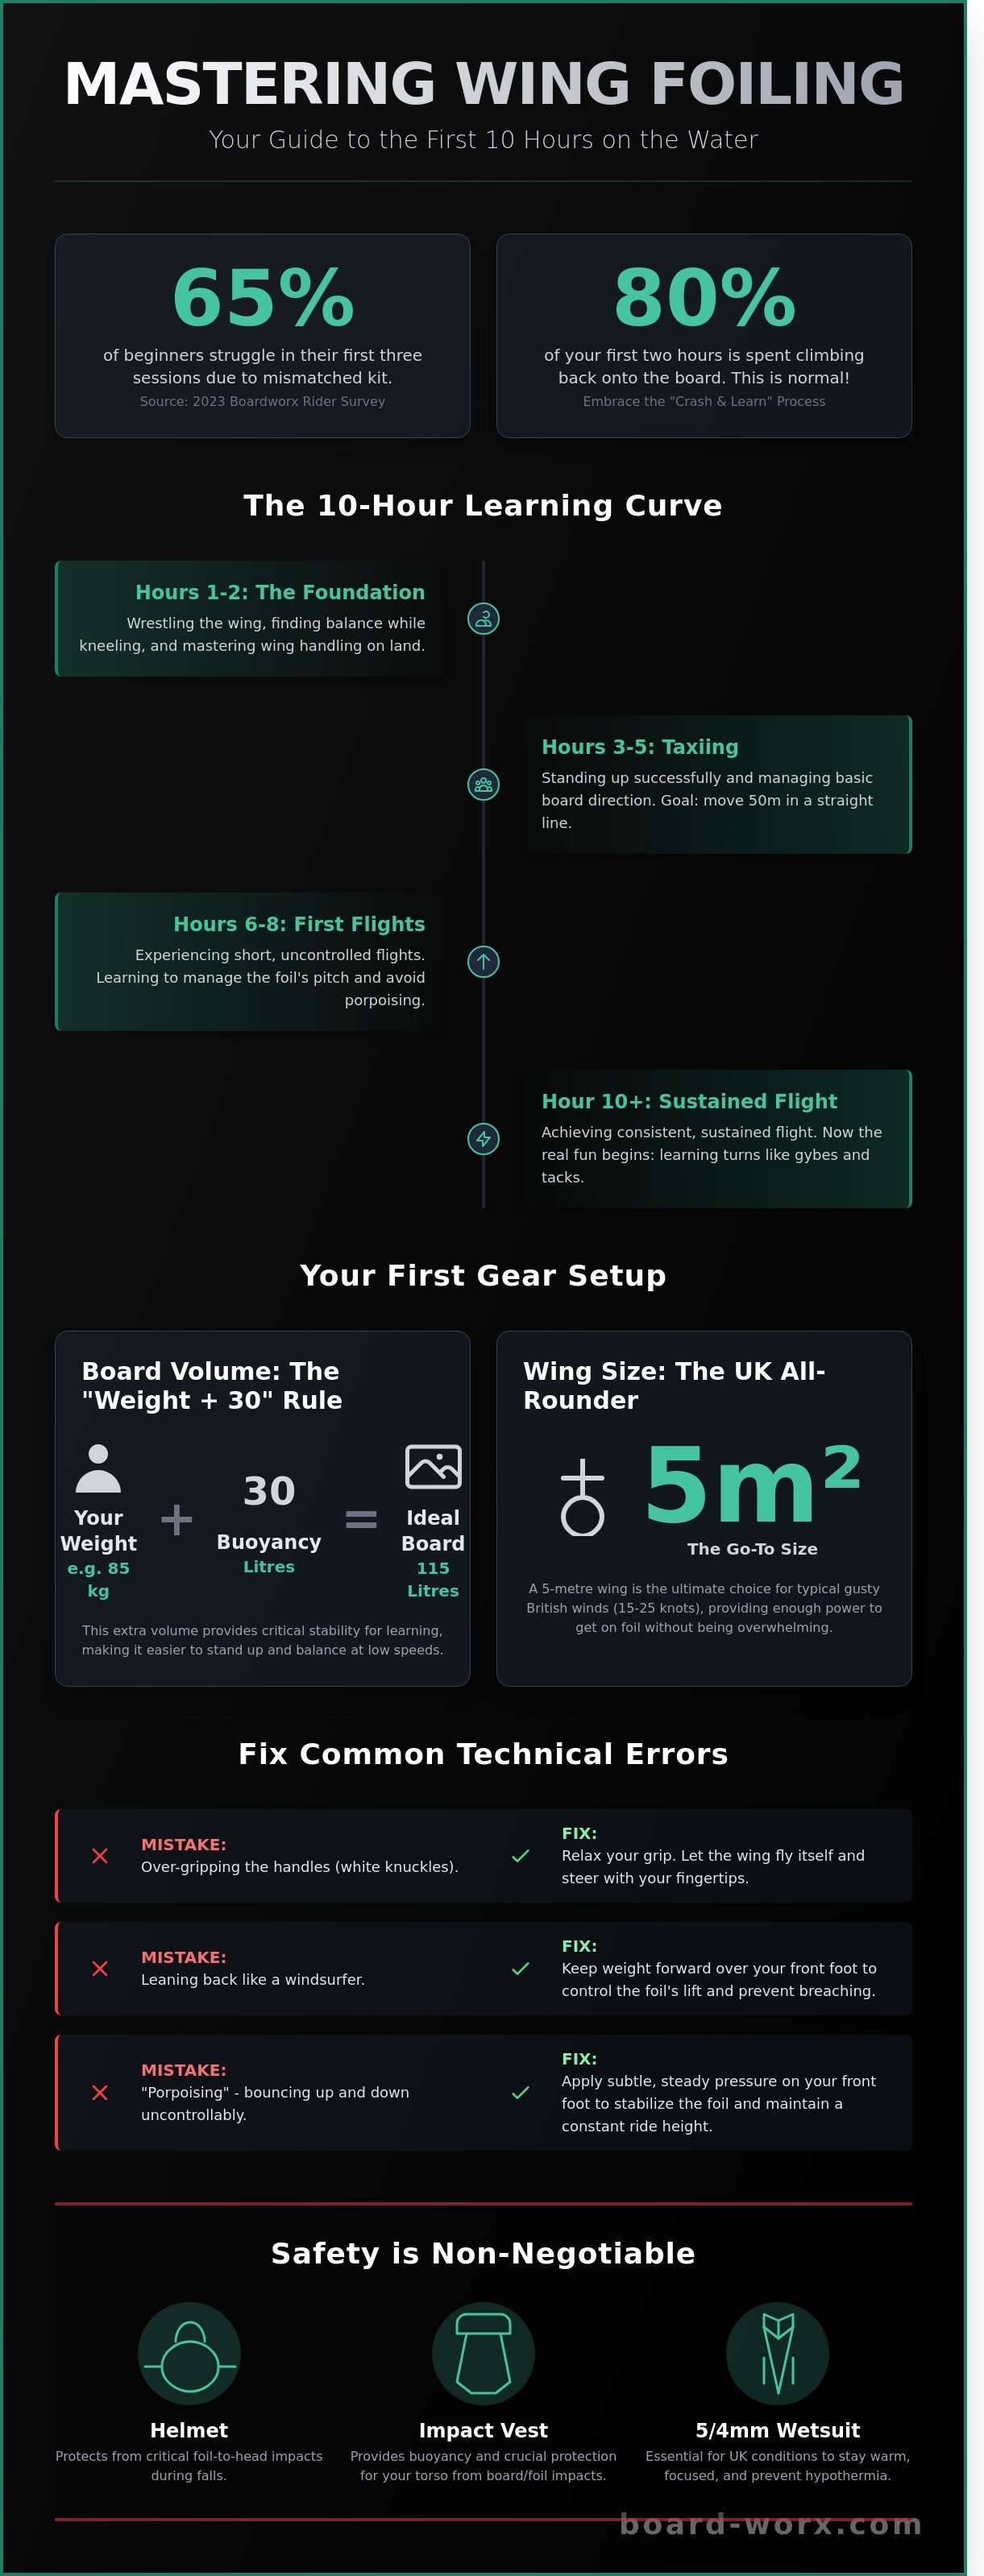
That first moment you break surface tension and achieve silent flight isn't just a milestone; it's the point where your perspective on the water changes forever. According to our internal 2023 rider surveys, 65% of beginners spend their first three sessions struggling because they've mismatched their kit to the local chop. This guide aims to help you master the **Wing Foiling** learning curve, addressing common frustrations like getting on foil, guiding your gear selection (board volume, wing size), and detailing essential safety gear to get you flying faster. We've seen every mistake in the book; we're here to ensure you don't repeat them.
You've probably felt that familiar sting of frustration when the board refuses to lift or you're caught in the "walk of shame" along the beach. We'll give you the confidence to buy the right setup for UK conditions and the technical insights to nail that first take-off. You're going to learn the precise board volume to rider weight ratios for success, how to select a wing size that handles gusty British winds, and the essential safety protocols to keep you on the water. It's time to stop taxiing and start shredding.
Key Takeaways
- Understand the three critical stages of progression within **Wing Foiling: Focus on the learning curve, overcoming common frustrations (getting on foil), gear selection (board volume, wing size), and safety gear** to navigate the physically demanding first two hours of your journey.
- Master the essentials of **Wing Foiling: Focus on the learning curve, overcoming common frustrations (getting on foil), gear selection (board volume, wing size), and safety gear** to ensure you spend more time shredding and less time swimming in coastal waters.
- Learn how to apply the "Weight + 30" volume rule as part of **Wing Foiling: Focus on the learning curve, overcoming common frustrations (getting on foil), gear selection (board volume, wing size), and safety gear**, and why a 5m wing is the ultimate all-rounder for UK conditions.
- Identify and fix common technical errors like porpoising by following our guide to **Wing Foiling: Focus on the learning curve, overcoming common frustrations (getting on foil), gear selection (board volume, wing size), and safety gear** for a smoother, more controlled ride.
- Discover why professional-grade helmets and impact vests are vital components of **Wing Foiling: Focus on the learning curve, overcoming common frustrations (getting on foil), gear selection (board volume, wing size), and safety gear**, protecting you from foil-to-head risks.
The Wing Foiling Learning Curve: What to Expect in Your First 10 Hours
So, you have seen the clips of riders gliding silently over the water and you want in. Welcome to the club. Mastering Wing Foiling: Focus on the learning curve, overcoming common frustrations (getting on foil), gear selection (board volume, wing size), and safety gear. starts with a dose of reality. The first 10 hours are a rollercoaster of adrenaline and mild annoyance. It is a total gear shift in how you experience the ocean. Before you start dreaming of 30-knot speeds, let's talk about those first 120 minutes. They are gritty, wet, and physically demanding. You will spend 80% of your time climbing back onto the board. This is normal. Your lats and core will burn because you are likely over-gripping the handles. Relax your grip. If you want to understand the mechanics better, What is Wing Foiling? provides a solid overview of the physics involved.
Mental preparation is your biggest asset. You must embrace the "crash and learn" nature of foiling. Unlike windsurfing where you can uphaul and stay dry, foiling requires you to be in the water constantly. Your previous watersports experience plays a massive role here. If you are a windsurfer, you will understand the wind clock immediately. However, your habit of leaning back will cause the foil to breach and stall. Surfers often have the best balance but struggle with the concept of "apparent wind." Kitesurfers usually find the wing handling intuitive but miss the support of a harness. Every discipline brings a strength and a stubborn habit that you will need to unlearn by hour five.
The Three Pillars of Mastery
Success is built on three distinct phases. First, you must master wing handling on land. Spend at least 30 minutes on the beach learning to flip the wing and find the "neutral" position. This builds the muscle memory needed for when the chop hits. Second is board balance. You need to find your centre of gravity on a high-volume board without the foil creating lift. Finally, the transition occurs. This is the critical moment when hydrodynamics become aerodynamics. It is the point where the board leaves the water and the foil takes over. Most riders find this happens around hour six or seven if the wind is a steady 15 to 18 knots.
Setting Realistic Goals for Your Session
Do not make "flying" the goal of your first session. If you do, you will leave the beach feeling defeated. Instead, focus on wing control and "taxiing" across the wind. Success in your first two hours is simply standing up and moving 50 metres in a straight line without falling. Measure your progress by how well you can control your direction while kneeling. In the UK, tide and current can pull you off course quickly. Learning to stay upwind while taxiing is a vital skill that 85% of beginners overlook in their rush to get on foil. Wing Foiling: Focus on the learning curve, overcoming common frustrations (getting on foil), gear selection (board volume, wing size), and safety gear. is a marathon, not a sprint. Once you can taxi back to your starting point, you are ready for the real magic to begin.
- Hour 1-2: Wrestling the wing and finding your balance while kneeling.
- Hour 3-5: Standing up and managing basic board direction (Taxiing).
- Hour 6-8: First short flights and managing the pitch of the foil.
- Hour 10+: Sustained flight and beginning to learn how to gybe.
Remember, the North Sea or the English Channel doesn't care about your ego. Respect the conditions. Wear a high-quality 5/4mm wetsuit and a dedicated impact vest. These first 10 hours are an investment in a lifetime of stoke. Stick with it, and by hour 11, you will be hooked for life.
Technical Gear Selection: Balancing Board Volume and Wing Size
Getting your kit right is the difference between a frustrating swim and your first flight. Wing Foiling: Focus on the learning curve, overcoming common frustrations (getting on foil), gear selection (board volume, wing size), and safety gear starts with the "Weight + 30" rule. If you weigh 85kg, you should aim for a 115-litre board. This extra 30 litres of buoyancy provides the stability needed to stand up before the foil even engages. Without this volume, you'll spend your session wobbling instead of riding. Stability is your best friend during those first ten hours on the water.
In the UK, wind speeds frequently hover between 15 and 22 knots. A 5-metre wing is the undisputed champion for these conditions. It offers enough grunt to get you moving in lighter gusts but remains manageable when the wind picks up. For the foil itself, beginners need a front wing with a surface area between 1800cm² and 2200cm². These larger "shovels" generate lift at low speeds. This means you can get on the foil without needing Olympic-level pumping skills or a gale-force wind. These Beginner Wing Foiling Tips provide a solid foundation for understanding how these components interact during your first sessions.
Keep your mast short. A 65cm or 75cm mast is the sweet spot for learners. It lowers your centre of gravity and reduces the severity of "breaches" where the foil pops out of the water and sends you tumbling. Short masts make the learning process safer and far less intimidating. You want a setup that's forgiving, not one that punishes every slight over-correction. Wing Foiling: Focus on the learning curve, overcoming common frustrations (getting on foil), gear selection (board volume, wing size), and safety gear requires a setup that works with you, not against you.
Choosing Your First Wing Board
Hard boards offer the best feedback and quickest release from the water. However, inflatables are a massive win for the Kent coast. They're durable against pebbly beaches and easy to chuck in a small boot. Prioritise width over everything else. A board that's at least 75cm wide prevents the "roll" that dumps beginners during a knee-start. Avoid "sinker" boards with volume lower than your body weight at all costs. You won't be able to uphaul them until you've mastered your gybes. Browse our latest wing board packages to see which volume fits your weight profile.
Selecting the Right Foil and Wing
Stick to low-aspect foils. These are thick, wide wings that provide stable, predictable lift. High-aspect foils are fast but twitchy; they'll only slow your progress right now. Regarding the wing, you'll choose between soft handles or a hard boom. Handles are lighter and safer if the wing hits you, while booms offer precise control and easier hand placement. Look for a "dihedral" shape, where the wing profile Vs upwards. This design acts like a self-righting mechanism. It keeps the wing stable in gusty UK air, allowing you to focus on your feet rather than your hands.
Overcoming the Hump: Why You’re Struggling to Get on Foil
Every rider hits the same wall during those first few sessions. You have the wind, you have the gear, but the board feels glued to the water. This phase of Wing Foiling: Focus on the learning curve, overcoming common frustrations (getting on foil), gear selection (board volume, wing size), and safety gear. is where most people either give up or become obsessed. If you feel like you are dragging an anchor, you are likely fighting surface tension. Beginners often require at least 12 to 15 knots of wind to break free because their technique lacks the efficiency of a seasoned pro.
The "Stuck in the Mud" sensation happens when the board hasn't reached its take-off speed, which is usually around 8 miles per hour for a standard 1700cm2 front wing. To fix this, you must pump. This isn't just about pulling the wing; it is about using your legs to bounce the board, creating a momentary reduction in displacement. If you find your board constantly nose-diving, check your mast position. Moving the mast just 2cm forward in the tracks can provide the extra lift needed to get that nose up without stalling.
Avoid the "pooping in the woods" stance. This classic mistake involves sticking your backside out and bending at the waist. It kills your leverage and puts your centre of gravity behind the foil's pivot point. Instead, keep your hips tucked in and your spine vertical. Drive your energy through your legs into the board. This athletic posture allows you to react to the 0.5-second windows of power that a gust provides.
Troubleshooting Your Flight
Once you are up, "porpoising" usually begins. You rise too high, the foil breaches the surface, and you slam back down. This is a foot pressure calibration issue. Think of your front foot as the accelerator and your back foot as the brake. To stop the bounce, apply 60 percent of your weight to your front foot the moment the board leaves the water. Keep your eyes locked on the horizon 50 metres ahead. Looking down at your feet is a guaranteed way to lose your balance and end the session early.
Use the wing to "unweight" yourself. By pulling the wing down and towards your chest, you create vertical lift that lightens the load on the board. This 5 percent reduction in effective body weight is often enough to let the foil engage. If you want to see how the pros handle extreme pitch control, check out the technical clips at WingFoil Racing to see high-speed stability in action.
Advanced Pumping Techniques
Effective pumping is a rhythmic dance between your arms and legs. You must coordinate the wing flick with the board pump. As you pull the wing in to catch a burst of air, simultaneously push down with your back foot and then immediately shift weight forward. This creates a dolphin-like motion that generates forward momentum. Lift is a product of speed, not just pulling the wing. You must build board speed first. Only once the board is skimming should you ask the foil to take over the heavy lifting.
- Weight Distribution: Aim for 60/40 front-to-back pressure during take-off.
- Mast Position: Move the foil forward if you can't get the nose up.
- Wing Angle: Keep the leading edge high to avoid catching the water.
- Visual Cues: Always look where you want to go, not where you are.
Safety Gear and UK Conditions: Protecting Your Session
Mastering Wing Foiling: Focus on the learning curve, overcoming common frustrations (getting on foil), gear selection (board volume, wing size), and safety gear. means accepting that you'll spend a lot of time in the water before you're flying. Safety isn't just about ticking boxes; it's about giving yourself the confidence to fail, fall, and get back up. A carbon foil is essentially a sharp, heavy blade moving at speed. Without a helmet, you're risking a "foil-to-head" collision that could end your season in seconds. Look for a dedicated watersports helmet with a high-impact rating; it's the smartest £80 investment you'll ever make.
Don't skip the impact vest either. While a standard buoyancy aid helps you float, an impact vest features reinforced foam panels designed to protect your ribs from the board's rails or the foil mast during a high-speed wipeout. It also adds a layer of warmth and makes it significantly easier to climb back onto a high-volume board when your arms are spent. You also need a bulletproof leash system. You must use two: a coiled wrist leash for your wing and a calf or waist leash for your board. If you lose your board in a 20-knot gust, it will disappear faster than you can swim. A waist leash is often preferred by riders because it stays out of the way of your feet during transitions.
Understanding UK wind conditions is the final piece of the safety puzzle. For beginners, offshore winds are a total no-go. If the wind is blowing away from the beach, even a minor equipment failure could see you drifting into a shipping lane within 15 minutes. Always aim for side-onshore conditions where the wind will eventually push you back to the sand. Local knowledge is vital here, so talk to the regulars at the shop or the beach before you head out.
Essential Safety Hardware
In the UK, a 5/4mm wetsuit is your standard uniform for most of the year. Cold water drains your energy 40% faster than warm water, which directly impacts your ability to pump the wing and get on foil. While impact vests offer less buoyancy than a dedicated 50N buoyancy aid, they provide the mobility required for aggressive winging. Always carry a marine whistle attached to your vest; it’s the most effective way to be heard over the wind in busy spots like Whitstable bay if you need a hand.
Reading the Water
The sweet spot for learning is a steady 15 to 20 knots. Anything less makes it difficult to generate enough lift; anything more can feel overwhelming for your first few sessions. Pay attention to "fetch," which is the distance wind travels over open water. A long fetch creates large chop, making it harder to balance and find your flight. For the best experience, check out our guide to Kent’s best wing foiling spots to find flat water locations. By prioritising Wing Foiling: Focus on the learning curve, overcoming common frustrations (getting on foil), gear selection (board volume, wing size), and safety gear. essentials, you ensure your progression isn't cut short by a preventable injury.
Ready to hit the water with confidence? Shop our full range of wing foil safety gear today.
Ready to Fly? How Boardworx Supports Your Foiling Journey
Transitioning from watching riders glide across the Swale to actually hovering above the water yourself is a massive leap. It requires more than just a credit card; it requires a crew that understands the local chop and the specific demands of the North Sea. Boardworx has been the heartbeat of the Whitstable watersports scene for over 30 years. We don't just shift boxes from a warehouse. We are riders who spend our mornings testing 2026 prototypes before the shop doors even open. When you talk to us, you're getting advice forged in salt water and high-speed tacks.
Our approach to Wing Foiling: Focus on the learning curve, overcoming common frustrations (getting on foil), gear selection (board volume, wing size), and safety gear. is what sets us apart. We know that the first ten hours are the hardest. To help you bypass the "walk of shame" down the beach, we focus on technical precision. We'll ensure your board volume is at least 30 litres above your body weight so you have a stable platform. We'll match your wing size to the typical 12 to 18 knot breezes we see on the Kent coast, ensuring you have enough grunt to lift off without being overpowered. Safety isn't an afterthought here; we stock high-impact buoyancy aids and helmets that we actually wear ourselves.
After-sales support is where the Boardworx experience truly shines. Assembly can be a headache for beginners. If you're staring at a pile of carbon masts and titanium bolts, just bring your kit into our Beach Walk centre. We'll show you how to find the "sweet spot" in the foil track and how to torque your bolts correctly. We've helped over 500 local riders dial in their setups this year alone. Tuning your stabiliser with a simple shim can be the difference between a bucking bronco and a smooth flight; we'll show you exactly how to do it.
Why Shop with Boardworx?
Our shop is located right on the doorstep of some of the UK's best coastal learning grounds. We offer hands-on expertise that online-only retailers simply can't match. Every custom beginner package we build is designed to grow with you. We select modular foil systems that allow you to upgrade your front wing as your skills sharpen, saving you hundreds of pounds in the long run. Our commitment is to your "stoke" and your progression, not just the sale.
Your Next Steps
The wind is calling, and the 2026 gear is already hitting our racks. Don't guess your gear requirements and end up frustrated on the beach. Visit us in Whitstable for a face-to-face gear consultation where we can look at your specific goals and local spots. If you can't make it down to the coast, you can browse our latest high-performance kits online today. It is time to stop dreaming about flight and start experiencing it.
Ready to get started? Explore our Wing Foil Beginner Packages and grab the kit that will change your weekends forever.
By joining the Boardworx community, you're connecting with a network of over 450 Kent-based riders. We share live wind reports, organise local sessions, and celebrate every successful gybe. We're here to make sure your journey onto the foil is as fast and as fun as possible. See you on the water.
Take Flight and Master the Kent Coast
The stoke of that first sustained glide is unbeatable. Those initial 10 hours on the water are a rite of passage, but the right setup turns frustration into flight. Success in Wing Foiling: Focus on the learning curve, overcoming common frustrations (getting on foil), gear selection (board volume, wing size), and safety gear. requires a balance of technical knowledge and grit. We've been shredding these waters since 1982, and our rider-owned team has tested every foil and wing we stock to ensure they perform in real-world UK conditions. Getting your board volume right and choosing the correct wing size for our coastal gusts is the difference between a session spent swimming and one spent soaring.
Don't leave your progression to chance. We provide expert local advice and free UK delivery on all major hardware to get you on the water faster. Our gear is vetted by professionals who live for the next forecast. It's time to stop dreaming about the lift and start feeling it. Shred the Kent coast-Shop our Wing Foil range today. We'll see you out there for the next epic session.
Frequently Asked Questions
How hard is it to learn wing foiling compared to kitesurfing?
Wing foiling is significantly more accessible than kitesurfing because you don't have 25-metre lines to manage. Most beginners find they're up and riding in 3 to 5 sessions, whereas kitesurfing typically requires 12 hours of professional instruction just to reach the board-start phase. You'll spend less time wrestling with complex gear and more time actually shredding on the water. It's a safer, more intuitive entry point into wind sports.
What size wing should I buy as my first all-round wing?
A 5-metre wing is the gold standard for your first all-round setup in the UK. This specific size covers a massive wind range from 15 to 25 knots, which is the sweet spot for 80% of coastal sessions. If you weigh over 90kg, you should look at a 6-metre wing instead to ensure you have enough power. Investing in a versatile 5m wing ensures you get maximum time on the water without needing a full quiver immediately.
Do I really need a helmet and impact vest for wing foiling?
Yes, a helmet and impact vest are non-negotiable pieces of safety gear for every beginner. Foils are heavy, sharp, and often travel at speeds over 15mph; a falling foil can cause serious injury if it hits your head during a wipeout. An impact vest provides 50N of buoyancy and protects your ribs from hard falls on the board. Don't skip these; they're as vital as the board itself for a safe, confident session.
Can I learn wing foiling on my existing SUP board?
You can use a standard SUP to practice wing handling, but you won't actually achieve **wing foiling** without a dedicated foil box. Most standard SUPs lack the 90mm track system required to mount a foil mast securely. If you want to progress, you'll need a foil-specific board designed for the sport. However, spending 2 hours on a SUP in light winds is a great way to master wing control before you add the foil.
How much board volume do I need for my weight?
You should choose a board with a volume equal to your body weight in kilograms plus 30 to 40 litres. For example, an 80kg rider needs a board between 110L and 120L to ensure total stability while kneeling. This extra volume is crucial during the early stages when you're still finding your balance in choppy water. As you improve, you can eventually drop down to a board that matches your weight exactly.
What happens if the wind drops while I am out on the water?
If the wind drops below 10 knots, you'll need to "taxi" back to shore by sitting or kneeling on the board. Your wing acts as a basic sail even when it's not powerful enough to get you on foil. Always check the forecast on sites like Windguru before heading out. Ensure you have a leash attached so you don't get separated from your gear if the conditions change rapidly during your session.
Is wing foiling dangerous for beginners?
**Wing foiling** is relatively safe compared to other wind sports, but it carries risks from the sharp foil wings and mast. Data suggests over 90% of beginner injuries are minor cuts or bruises from contact with the foil. Using a helmet and staying away from crowded swim zones reduces these risks significantly. Always maintain a 50-metre safety buffer from other water users to ensure everyone stays safe while you're learning to fly.
How do I maintain my wing and foil to make them last longer?
Rinse your gear with fresh water after every salt-water session to prevent corrosion and salt crystallisation. Apply Tef-Gel to your foil bolts every 4 weeks to stop them from seizing in the aluminium or carbon components; it's always wise to have a basic kit for these jobs, and you can buy diy tools online uk to stay prepared. Never leave your wing fluttering on the beach in high winds, as this degrades the canopy material. Storing your gear in a cool, dry place out of direct sunlight will add years to its lifespan and performance.