
The Ultimate Wetsuit & Apparel Guide: Master Your Fit, Gear, and UK Session Longevity
What if that £400 flagship suit you just bought is actually the reason you're cutting your winter sessions short? Most riders assume price equals warmth, but a 5mm suit that flushes at the neck is useless when the North Sea hits a biting 6°C in mid-January. We know the frustration of watching epic sets from the car park because your neoprene perished after just eight months or your zip jammed right when the swell was peaking. This guide on Wetsuits & Apparel: Focus on fit and sizing guides, material comparisons (neoprene thickness, zip types), repair, cleaning/storage, and layering for UK weather ensures you never miss a tide again.
We agree that nothing ruins the stoke faster than gear that doesn't perform when the conditions are firing. We promise to show you how to achieve a "second skin" fit and maintain your kit so it lasts for years of heavy use. We're breaking down everything from neoprene thickness to DIY repairs to keep you warm and shredding through every British season.
Key Takeaways
- Dial in your neoprene thickness and seam construction by consulting this guide's insights into material comparisons and fit, ensuring maximum session time in testing waters.
- Get the inside track on selecting the ideal wetsuits and apparel, understanding material choices, and mastering layering strategies for diverse UK weather, ensuring you're always kitted out for the conditions.
- Achieve that elusive 'second skin' fit by understanding the nuances of wetsuit sizing guides, material flexibility, and how neoprene memory moulds to your body shape.
- Learn the modular secrets of wetsuit layering and complementary apparel detailed in this guide that can transform a standard 4/3mm suit into a technical, winter-ready rig for UK sessions.
- Protect your investment with pro-level repair, cleaning, and storage hacks from Boardworx, shielding your wetsuits and apparel from the effects of salt and UV.
Understanding Neoprene Technology and Thickness for UK Waters
Neoprene is the engine room of your session. It is a closed-cell foam packed with tiny nitrogen bubbles that trap a thin layer of water against your skin. Your body heat warms this water, creating a thermal barrier that keeps you in the line-up longer. Modern Wetsuit technology and materials have evolved to maximise this insulation while reducing weight. When you are looking at Wetsuits & Apparel: Focus on fit and sizing guides, material comparisons (neoprene thickness, zip types), repair, cleaning/storage, and layering for UK weather to ensure you get the most out of every swell.
Thickness is measured in millimetres and usually appears as two or three numbers, such as 5/4/3mm. The first number identifies the thickness of the neoprene on the torso and back to protect your core. The subsequent numbers refer to the limbs. A 5mm chest panel keeps your vital organs functioning in 8°C water, while 3mm arms allow for the high-performance flexibility needed for aggressive paddling or kite loops. It is a calculated trade-off between warmth and movement.
The choice between limestone and petroleum-based neoprene is a game-changer for performance. Limestone neoprene is derived from calcium carbonate that is 99.7% pure. It features a higher micro-cell structure than its oil-based counterparts. This means the suit is lighter, warmer, and absorbs less water over time. It offers a massive 480% stretch capacity, which is vital when you are fighting against a heavy North Sea current. Choosing limestone is not just an "eco" move; it is a commitment to better gear that lasts longer.
The UK Temperature Guide: 3/2mm to 6/5mm
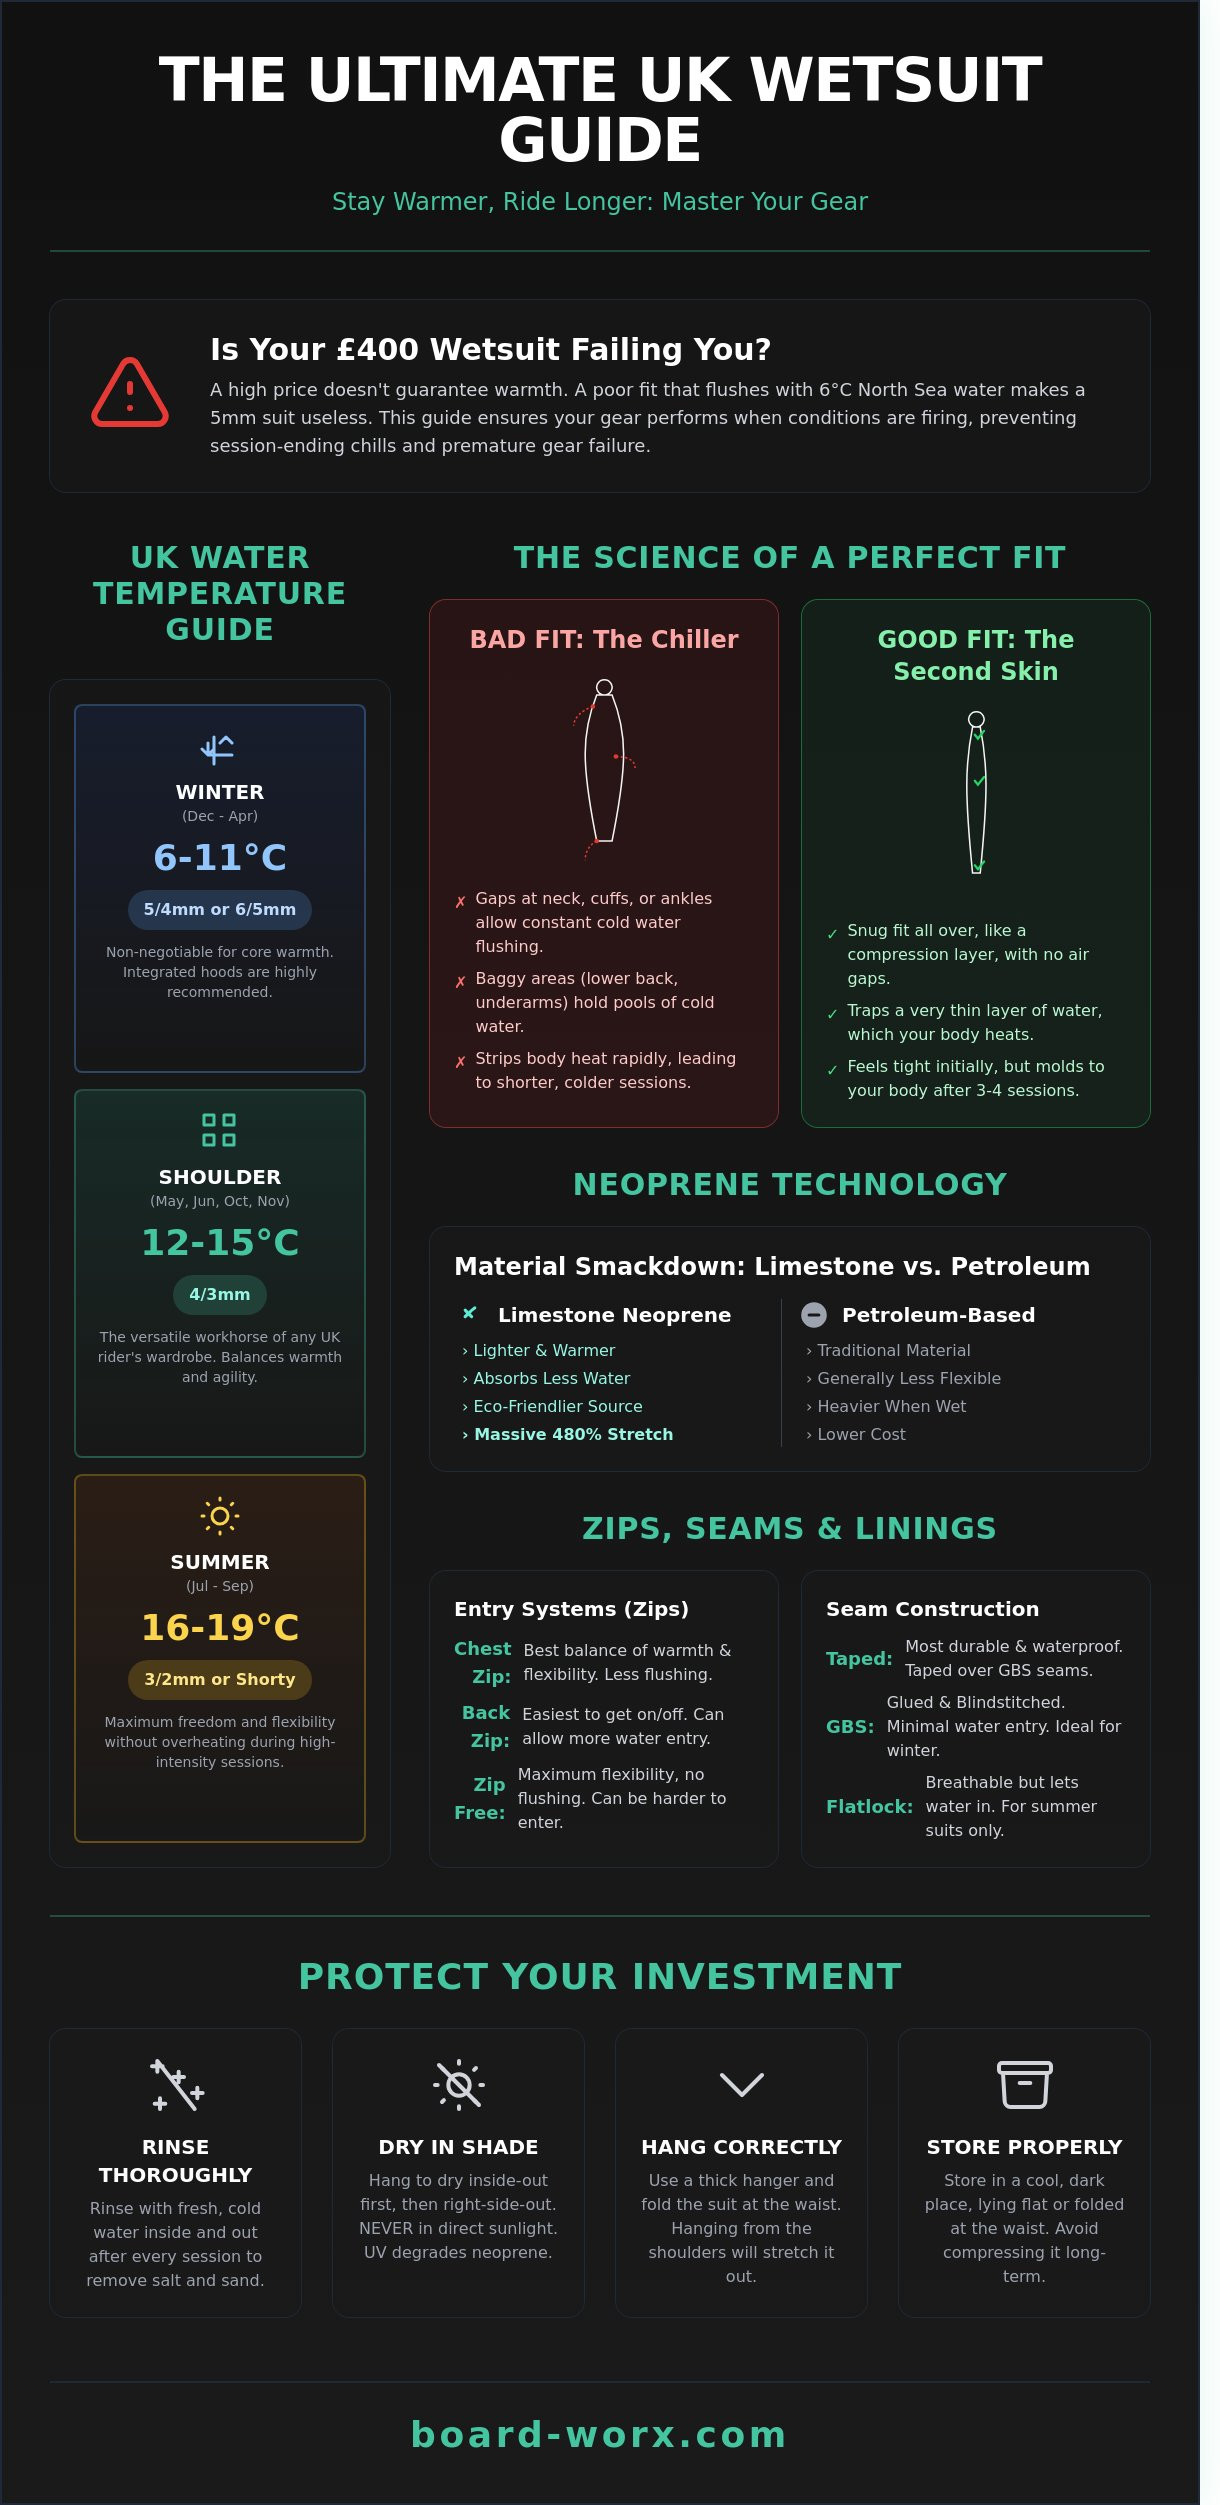
Summer sessions from July to September usually see UK coastal waters hit 16°C to 19°C. A 3/2mm suit or a shorty is the favourite for Kent's warmer days. It provides enough protection from the wind-chill without causing you to overheat during high-intensity movement. You get maximum freedom to shred without the bulk.
Shoulder seasons in May, June, October, and November are the most unpredictable. Water temperatures hover between 12°C and 15°C. A high-quality 4/3mm suit is the ultimate versatile tool for these months. It balances the thermal protection of a winter suit with the agility of a summer kit. It is the workhorse of any UK rider's wardrobe.
Winter from December to April is a different beast. With temperatures dropping to 6°C in the North Sea or English Channel, a 5/4mm or 6/5mm suit is non-negotiable. These suits often feature integrated hoods to prevent ice-cream headaches. Don't compromise here. A thick, high-end suit is the only thing standing between an epic session and an early trip back to the van.
Internal Linings and Thermal Tech
Hollow-fibre linings act like a base layer for your suit. They feature a fuzzy texture that wicks water away from the skin and traps air, which is a far better insulator than water. This tech significantly boosts the heat rating of a suit without adding millimetres of rubber. Look for these panels in the chest and back areas where core heat retention is critical.
Single-lined neoprene, often called "smooth skin," is designed to shed water and block wind-chill. It is perfect for kitesurfers and windsurfers who spend more time above the surface. Double-lined neoprene is tougher. It features a nylon layer on both sides to protect the foam from nicks and tears. A thermal lining is a hydrophobic interior layer that accelerates drying time. Balancing these materials ensures your Wetsuits & Apparel: Focus on fit and sizing guides, material comparisons (neoprene thickness, zip types), repair, cleaning/storage, and layering for UK weather strategy keeps you on the water year-round.
The Science of the Perfect Fit: Sizing Your Wetsuit Like a Pro
Getting the fit right is the difference between an epic session and a shivering nightmare. Your suit must act as a second skin. It needs to be tight enough to trap a thin layer of water without letting it flush through every time you duck dive. Neoprene is a closed-cell foam; it relies on your body heat to warm that trapped water. If the suit is loose, cold water cycles in and out, stripping your warmth in minutes. Mastering the selection of Wetsuits & Apparel: Focus on fit and sizing guides, material comparisons (neoprene thickness, zip types), repair, cleaning/storage, and layering for UK weather. ensures you stay in the water longer while others are heading for the car heater.
Remember that neoprene has a memory. A brand-new suit will feel exceptionally tight at first, but it typically takes 3 to 4 sessions to fully break in and mould to your specific body shape. If you're choosing a wetsuit for UK waters, you have to account for this compression. Look out for common failure points like "lower back pools" where air pockets or water collect. This is a clear sign the suit is too long in the torso. Similarly, "neck rub" often suggests the collar is sitting too high or the suit is being pulled too tight vertically. Use these two tests before you buy:
- The Squat Test: Drop into a deep surf stance. If the neoprene pulls painfully across your back or shoulders, it is too small.
- The Arm Swing: Rotate your arms in a full paddling motion. You should feel some resistance, but it shouldn't cut off circulation or pinch in the armpits.
How to Measure Your Body for a Wetsuit
Grab a flexible tape measure and record your chest, height, and weight in kilograms. While height and chest matter, our data shows that 85% of fit issues stem from ignoring the weight bracket. If you are 80kg but squeeze into a suit rated for 72kg, you will overstretch the neoprene cells, reducing its thermal efficiency by up to 30%. Every brand has a unique cut. O'Neill usually offers more room in the shoulders, while brands like Mystic or Rip Curl often favour a leaner, athletic silhouette. If you find yourself between sizes, always size down for a performance fit unless you have a particularly tall frame.
Addressing the 'Hard to Get On' Objection
If you don't struggle for at least 5 minutes to get into a new 5/4mm winter suit, it is probably too big. A suit that slides on easily in a dry changing room will become a baggy sack once you hit the surf. To make the process easier, use the plastic bag trick; slip a small carrier bag over your foot to help it slide through the narrow leg openings. Pairing your suit with neoprene boots also helps the cuffs glide into position without snagging the internal lining. Work the material up incrementally from the ankles to the calves, then the knees to the thighs, ensuring there is no bunching behind the knees before you pull the torso up. Check out our latest high-performance wetsuits to find your next second skin and start your season with total confidence.
Zips and Seams: Comparing Entry Systems and Construction
The entry system and seam construction represent the engine room of your suit. These technical elements dictate how long you can stay in the water before the cold creeps in. When you are browsing our collection of Wetsuits & Apparel: Focus on fit and sizing guides, material comparisons (neoprene thickness, zip types), repair, cleaning/storage, and layering for UK weather., understanding these specs is the difference between an epic session and a shivering retreat to the van. A suit with the best neoprene in the world will still fail if the seams leak or the zip allows constant flushing.
Entry systems influence both your range of motion and the amount of water "flush" you experience during a wipeout. Seam construction determines the suit's lifespan and its ability to trap heat. High-end suits often utilize liquid taping or internal seals to reinforce high-stress areas like the crotch and underarms. These additions can increase the price by £50 to £100 but offer a massive return in durability. GBS (Glued and Blind Stitched) seams are the industry standard for cold-water performance.
Back Zip vs. Chest Zip vs. Zip-Free
Back zips are the easiest to get on and off. They feature a long vertical zip that opens the suit wide, making them ideal for riders with broader shoulders or limited flexibility. However, that zip is a rigid point. It reduces the stretch across your back and can lead to "spine flush," where a burst of cold water enters through the zip teeth during a duck dive. For 12°C summer sessions, a back zip is a convenient choice, but it rarely wins on pure performance.
Chest zips are the current favourite for UK surfers and kiters. By moving the entry to the front, manufacturers leave the entire back panel as a single piece of neoprene. This design provides superior flex for paddling and creates a much tighter seal around the neck. It effectively eliminates the flush factor. While they take an extra thirty seconds to wiggle into, the thermal benefits in 8°C winter conditions are undeniable.
Zip-free suits represent the ultimate in flexibility. By removing the heavy plastic or metal hardware entirely, these suits feel like a second skin. They rely on overlapping neoprene panels to keep water out. You will need a Houdini level of mobility to get into one of these, but once it's on, the freedom of movement is unmatched. These are fantastic for high-performance shredding, though the entry collar can stretch out over 12 months of heavy use.
Seam Tech: Flatlock vs. GBS vs. Powerseams
Flatlock stitching is rugged and durable. It involves overlapping two pieces of neoprene and stitching through them. This creates a strong seam, but it also leaves thousands of tiny holes in the material. Water will travel through these holes constantly. Because of this, flatlock suits are strictly for summer use or watersports where you aren't fully submerged. They are standard on 2mm shorties but have no place in a winter 5/4mm rig.
GBS seams are the baseline for any serious UK kit. The edges are glued together before a curved needle stitches halfway through the material. This ensures no holes go all the way through the suit. It creates a waterproof barrier that keeps your body heat locked inside. Most mid-range suits priced between £200 and £300 rely on this technology to handle the North Sea's bite.
Powerseams or liquid taping take things to the professional level. An outer silicone or rubber layer is applied over the GBS seam, making it 100% airtight. This prevents the thread from fraying and adds roughly 30% more life to the suit's structural integrity. When you're investing in Wetsuits & Apparel: Focus on fit and sizing guides, material comparisons (neoprene thickness, zip types), repair, cleaning/storage, and layering for UK weather., look for internal taping on the most stressed joins to ensure your gear survives more than one season of heavy use.
Layering and Accessories: Essential Apparel for UK Weather
UK watersports demand a modular gear strategy to handle rapid temperature shifts. One hour you are basking in spring sunshine; the next, a North Sea squall drops the mercury by five degrees. Layering isn't just a tactic for hikers. Technical base layers allow you to stretch the season of a 4/3mm suit, effectively turning it into a winter-ready rig. By adding or removing components, you stay comfortable through a 10-degree temperature swing without buying three different suits. When considering Wetsuits & Apparel: Focus on fit and sizing guides, material comparisons (neoprene thickness, zip types), repair, cleaning/storage, and layering for UK weather to ensure you are never caught out by a falling tide or rising wind.
Neoprene Accessories: Boots, Gloves, and Hoods
Accessories are your first line of defence against the infamous ice cream headache and numb toes that end sessions early. In the UK, boots are essential from late October through to May. We recommend 5mm to 7mm split-toe boots as the gold standard. The split-toe design prevents your foot from sliding inside the boot, providing a 20% increase in lateral stability during high-pressure turns. It offers a barefoot feel while the 7mm neoprene keeps your circulation flowing in 6°C water.
Gloves require a delicate balance. You need enough thickness for warmth but enough "palm feel" to maintain a secure grip on your bar, boom, or paddle. A 3mm pre-curved glove is the sweet spot for most UK riders. It reduces forearm fatigue by mimicking the hand's natural resting position. For high-speed sports like wing foiling or kitesurfing, an integrated hood is vastly superior to a separate one. Integrated hoods create a seamless seal that prevents cold water from flushing down your neck during a 25mph wipeout, keeping your core temperature stable for 30% longer.
Technical Base Layers and Rash Vests
Don't overlook the power of a technical base layer. Polypro and thermal vests add a 0.5mm layer of insulation without the restrictive bulk of a thicker wetsuit. These garments use hydrophobic fibres to wick water away from your skin, creating a dry pocket of air that retains heat. Adding a hooded thermal vest under a standard chest-zip suit is the most cost-effective way to upgrade your kit for the deep winter months. It provides that extra bit of warmth needed when the air temperature hits single digits.
- Thermal Vests: Increase heat retention by approximately 15% without affecting shoulder mobility.
- Rash Vests: Essential for preventing neoprene abrasion on the neck and underarms during long sessions.
- UV Protection: Quality rash guards provide UPF 50+ protection, which is vital during those rare 20°C UK summer days.
The session doesn't end the moment you step onto the sand. Your core temperature can drop by two degrees within ten minutes of exiting the water if you are exposed to the wind. This is where changing robes become the ultimate UK shore-side accessory. These robes act as a portable changing room and a weather-proof shelter. They trap your body heat and dry you instantly, making the transition from the Atlantic swell to the car heater much more bearable. They are a staple at every UK beach for a reason; they protect your dignity and your health.
Ready to upgrade your setup?
Shop our full range of technical neoprene accessories and stay out longer.
Longevity and Maintenance: Cleaning, Storage, and DIY Repair
You have just invested £300 to £500 in a high-performance suit. Protecting that investment is the difference between a suit that lasts four seasons and one that loses its flex by Christmas. Saltwater and UV rays are the primary enemies of neoprene longevity. Salt crystals act like tiny shards of glass; they lodge inside the foam cells and tear the material from the inside out every time you move. Meanwhile, direct sunlight breaks down the chemical bonds in the rubber, making it brittle and prone to cracking. To maximise the lifespan of your Wetsuits & Apparel: Focus on fit and sizing guides, material comparisons (neoprene thickness, zip types), repair, cleaning/storage, and layering for UK weather, you must commit to a strict maintenance regime.
Never, ever use a washing machine or a tumble dryer for your technical apparel. The mechanical agitation of a 1,200 RPM spin cycle can delaminate the outer jersey from the internal neoprene core. High temperatures melt the specialised glues used in liquid-sealed seams, effectively turning your expensive winter suit into a leaky sieve. Stick to cold or lukewarm water and manual cleaning only.
The Post-Session Cleaning Ritual
Rinse your suit with fresh water inside and out after every single use. This simple act can increase the life of the neoprene by 40 percent. Pay close attention to the zips; salt build-up is the leading cause of zip seizure. Use a specialised "wetsuit wash" once a month to remove bacteria, skin oils, and that inevitable "damp dog" smell. These cleaners are pH-neutral and won't degrade the rubber. When drying, keep it in the shade. UV light kills the "colour" and flex of the suit, turning a vibrant, stretchy garment into a stiff, grey relic. Hang it inside out first to ensure the part touching your skin is dry for the next session.
Repairing Your Suit: The DIY Masterclass
Small nicks from fingernails or sharp fins do not mean the suit is dead. These are easily fixed at home for less than £10. Identifying "blind stitch" failures vs. simple neoprene nicks is the first step. If the thread is pulling through, it needs immediate attention before the seam opens up completely. For small punctures, use a neoprene glue like Black Witch. Apply a thin layer to both sides of the tear, wait two minutes until it becomes tacky, and press them together firmly. This creates a chemical bond that is often stronger than the original material. Let it cure for 24 hours before heading back into the water.
Proper storage prevents "shoulder crease" and permanent compression of the foam cells. Avoid thin wire hangers at all costs. The weight of a wet 5mm suit can exceed 3kg; this concentrated pressure will slice through the shoulder neoprene over time. Use these methods instead:
- Wide, Padded Hangers: Use hangers with at least a 5cm shoulder width to distribute the weight evenly.
- The Slide-Hanger: Drape the suit through the middle bar of a heavy-duty hanger so it hangs at the waist.
- Flat Storage: If you aren't using the suit for the summer season, lay it flat in a cool, dry cupboard.
Treat your gear with the same respect you give your board. A well-maintained suit keeps you in the water longer, ensuring you never miss those epic UK winter swells because of a gear failure. Keep it clean, keep it out of the sun, and keep shredding.
Level Up Your Next UK Session
Don't let the North Sea chill cut your time on the water short. Mastering the technical side of your gear ensures you stay out longer and perform at your peak. You now understand that choosing the right neoprene thickness, such as a 5/4mm for 8°C winter mornings, is only the beginning. A millimetre-perfect fit prevents cold water flush, while smart layering with hoods and boots keeps your core temperature stable. We have explored the essentials of Wetsuits & Apparel: Focus on fit and sizing guides, material comparisons (neoprene thickness, zip types), repair, cleaning/storage, and layering for UK weather. Taking ten minutes to rinse your suit in fresh water and storing it away from direct sunlight can easily double its lifespan. Since 1982, our rider-owned team has tested this kit in the harshest British conditions to ensure you get maximum performance. Whether you're debating a chest zip or need a DIY repair kit, our expert sizing advice is available to help you nail the perfect setup.
Gear up for your next session; shop our expert-tested Wetsuit range at Boardworx and grab free UK delivery on all orders over £50. Get out there and shred.
Frequently Asked Questions
How often should I wash my wetsuit with soap?
You should wash your suit with dedicated neoprene cleaner every 5 to 10 sessions to prevent salt crystal buildup and bacteria growth. Don't use standard laundry detergent as it ruins the neoprene's flexibility within 3 washes. Instead, soak your gear in 10 litres of cool water with 15ml of specialised shampoo for 15 minutes. This routine preserves the internal lining and keeps your kit smelling fresh for your next epic session.
Can I use a surfing wetsuit for kitesurfing or wing foiling?
You can certainly use a surfing suit for wind sports, but you'll notice the difference in 20 knot winds. Surfing suits focus on paddle flexibility, while wind-specific designs feature textured "smooth skin" panels to reduce wind chill by up to 30 percent. They also include drain holes at the ankles to stop water ballooning during a heavy crash. If you're shredding in the UK, a wind-focused suit is a game changer.
What should I wear under my wetsuit for extra warmth?
Layering your Wetsuits & Apparel is the most effective way to tackle 6°C North Sea winter sessions. Grab a 0.5mm polypropylene thermal vest or a 1mm neoprene hooded base layer to boost your core temperature without adding bulk. These thin layers trap an extra pocket of warm water against your skin. Avoid standard gym leggings or cotton shirts; they'll just hold cold water and make you freeze 20 minutes faster.
Why is my wetsuit rubbing my neck, and how can I stop it?
Neck rubbing, or "wetsuit burn," happens because salt crystals and sand create friction against your skin during 2 hour sessions. You can stop this instantly by applying a 100 percent petroleum-free lubricant or surf balm to your neck before heading out. Alternatively, wearing a thin 0.5mm rash vest with a high collar provides a protective barrier. Make sure your neck closure is snug but not tight enough to fold the neoprene.
How long should a high-quality wetsuit last in the UK?
A premium suit typically lasts between 200 and 300 sessions, which usually equates to 2 or 3 seasons for the average UK rider. High-performance 5mm neoprene is built for warmth but is more delicate than entry-level foam. You'll notice the seams start to lose their integrity after about 24 months of regular use. Proper rinsing and drying your kit in the shade can extend this lifespan by an extra 12 months.
Is it better to have a suit that is slightly too small or slightly too big?
Always choose the tighter fit because neoprene expands by approximately 10 percent once it gets wet. Our range of Wetsuits & Apparel is designed to feel like a second skin; if there's a gap behind your knees or lower back, water will "flush" through the suit. This constant flow of cold water prevents your body from heating the internal layer, ending your session 45 minutes earlier than planned.
What is the difference between a 'blind stitch' and a 'flatlock' seam?
Blind stitching is essential for UK waters below 15°C because the needle never fully penetrates the neoprene, making the seam watertight. Flatlock seams are stitched all the way through, leaving thousands of tiny holes that let water and wind pass through freely. For winter 5/4mm suits, always look for GBS (Glued and Blind Stitched) seams. Flatlock is strictly for summer shorties or 2mm suits used in the warmest July conditions.
How do I fix a small tear in my neoprene at home?
You can fix fingernail nicks and small tears under 20mm using a tube of neoprene glue like Black Witch. Clean the area with fresh water and let it dry completely for 24 hours before starting. Apply a thin coat of adhesive to both edges of the tear, wait 5 minutes for it to become tacky, then press them firmly together. This creates a permanent, flexible bond that will survive your next heavy wipeout.